We can create a list of app names, app icons, app versions and app package names from information received using PackageInfo class.


6. In onCreate event, add an add source directly block. Inside the block add following code.
List<android.content.pm.PackageInfo> listn = getApplicationContext().getPackageManager().getInstalledPackages(0);
This will create a list of PackageInfo of all installed apps.

7. Add another add source directly block and add following code in it.
for (android.content.pm.PackageInfo packageInfo : listn) {
list11.add(packageInfo.applicationInfo.loadLabel(getPackageManager()).toString());
list12.add(packageInfo.packageName);
list13.add(packageInfo.versionName);
list14.add(String.valueOf(packageInfo.versionCode));
This code will retrieve information from PackageInfo list, and add items to new lists. It will add all app names to list11, all package names to list12, all version names to list13, and all version codes to list14.
8. Next, use Block add key X value X to List Map list1.

9. Add another add source directly block and put following code in it:
{
HashMap<String, android.graphics.drawable.Drawable> _item = new HashMap<String, android.graphics.drawable.Drawable>();
_item.put("itm",packageInfo.applicationInfo.loadIcon(getPackageManager()));
list6.add(_item);
}
}
This code gets app icons from the list of PackageInfo and adds them to list6.
10. After this add a ListView setListCustomViewData List Map block, as shown in image below.

11. Add another add source directly block. Inside the block, add a } bracket to close onCreate event, and after that write code for a new HashMap list, list6. This will act as list of icons. The code to be used is given below.
Here imageview1, is id of Imageview in CustomView, and list6 is the new Drawable list created in above step.
13. Add another event ListView onItemClicked, and here use Intent component blocks to open the app when it is clicked. The blocks to be used is shown in image below.

14. Save and run the project. You will see a custom list with list of all installed apps with icons, package names, etc.


Follow the steps below to create a list of all installed apps, with app name, app icons, package name, version name and version code.
1. In VIEW area of your sketchware project, in main.xml add a ListView.

2. Add a new CustomView custm.xml and in this add an ImageView and four TextViews.

3. For the ImageView set width and height as 60dp and scale_type as FIT_XY.

4. In main.xml, for ListView select custm as customView.

5. In LOGIC area, add four List String (list11, list12, list13, and list14), add a List Map (list1), and an Intent component i. These four will act as list of app name, package name, version name, and version code.

6. In onCreate event, add an add source directly block. Inside the block add following code.
List<android.content.pm.PackageInfo> listn = getApplicationContext().getPackageManager().getInstalledPackages(0);
This will create a list of PackageInfo of all installed apps.

7. Add another add source directly block and add following code in it.
for (android.content.pm.PackageInfo packageInfo : listn) {
list11.add(packageInfo.applicationInfo.loadLabel(getPackageManager()).toString());
list12.add(packageInfo.packageName);
list13.add(packageInfo.versionName);
list14.add(String.valueOf(packageInfo.versionCode));
This code will retrieve information from PackageInfo list, and add items to new lists. It will add all app names to list11, all package names to list12, all version names to list13, and all version codes to list14.
8. Next, use Block add key X value X to List Map list1.

9. Add another add source directly block and put following code in it:
{
HashMap<String, android.graphics.drawable.Drawable> _item = new HashMap<String, android.graphics.drawable.Drawable>();
_item.put("itm",packageInfo.applicationInfo.loadIcon(getPackageManager()));
list6.add(_item);
}
}
This code gets app icons from the list of PackageInfo and adds them to list6.
10. After this add a ListView setListCustomViewData List Map block, as shown in image below.

}
private ArrayList < HashMap < String, android.graphics.drawable.Drawable> > list6 = new ArrayList<>(); private void nothing() {
This should be the last block in onCreate event. There should be no block placed after this. This code can also be added in a more block.
12. Add a new event ListView onBindCustomView, and set the text of all TextViews in CustomView, to the String lists list11, list12, list13, and list14. Also add code to set icons as image of imageview1. The blocks to be used is shown in image below.
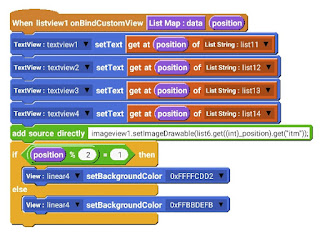
The code to be used in add source directly block is:
imageview1.setImageDrawable(list6.get((int)_position).get("itm"));

imageview1.setImageDrawable(list6.get((int)_position).get("itm"));
Here imageview1, is id of Imageview in CustomView, and list6 is the new Drawable list created in above step.
13. Add another event ListView onItemClicked, and here use Intent component blocks to open the app when it is clicked. The blocks to be used is shown in image below.


Watch the video below for better understanding.

Comments
Post a Comment